Showing posts with label Sewing for Kids. Show all posts

Thursday, 20 August 2015

A SPRINKLING OF "FROZEN": D-I-Y Elsa Dress and a FROZEN Birthday

This post has been due for long....our little one turned five this year. We had a memorable birthday.
It was a no-brainer that she wanted a FROZEN birthday complete with an ELSA dress.


A Frozen Birthday and DIY Elsa Dress @http://colorsofourrainbow.blogspot.ae/

So here is the story of how we made it happen :)

The dress that Elsa wears as she goes up to the North Mountain is amazing, and the details were too good. I wanted to replicate the look but in a way that flatters a 5-year-old frame and can still be used as a party dress and not just for pretend play.

I got hold of some beautiful sequined net fabric and some organza and set about making this dress.
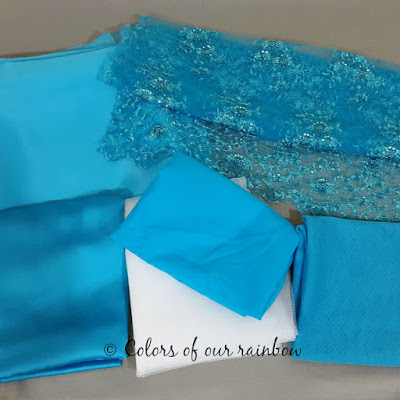
A Frozen Birthday and DIY Elsa Dress @http://colorsofourrainbow.blogspot.ae/

The dress is not an exact replica of what ELSA wears, but a close inspiration.

The first step was to make an underskirt or crinoline. A simple layered 3-tier of a stiff tulle over an cotton skirt can easily make the skirt puff up. The shortest layer of tulle goes underneath and the longest on top. The layers can be increased to give more puff. But I stuck with three.


A Frozen Birthday and DIY Elsa Dress @http://colorsofourrainbow.blogspot.ae/

The princess asked for a dress that would let her dance around with a lot of "woosh" to LET IT GO. So I settled for a two layer of circle skirt above this underskirt, the inner circle skirt would be of satin and the outer skirt made of organza.

Making a circle skirt seems easy, but a bit of maths is required. I stumbled upon this genius  Circle skirt APP by BYHANDLONDON.COM
Its so easy to calculate the length of fabric needed , and the radius of the waist and the length of the skirt.

Sewing both the circles and the underskirt, here's what it looks like.
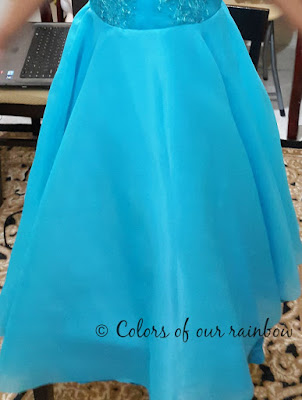

A Frozen Birthday and DIY Elsa Dress @http://colorsofourrainbow.blogspot.ae/

I kept the bodice simple with a cotton lining, as the fabric itself was a beautiful net with sequins and rhinestones. A sash in satin to the waist and I set out to sew by hand some sparkly rhinestones to the sash and in a cascading effect on the skirt. This took the longest time of all.


A Frozen Birthday and DIY Elsa Dress @http://colorsofourrainbow.blogspot.ae/

The dress can never be complete without the cape, can it?? A good length of tulle and some elastic for the bands to put the arms through. The cape can be worn and removed on whim. I could not recreate the rhinestones on the train. But I cut some snowflakes out of a sparkly white organza and sewed it down to the end.

Here's the link forTHE SNOW FLAKE PATTERN I used. Just substitute paper for some sparkly and stiff fabric.

Some hard work and a lovely dress to keep the little one happy.
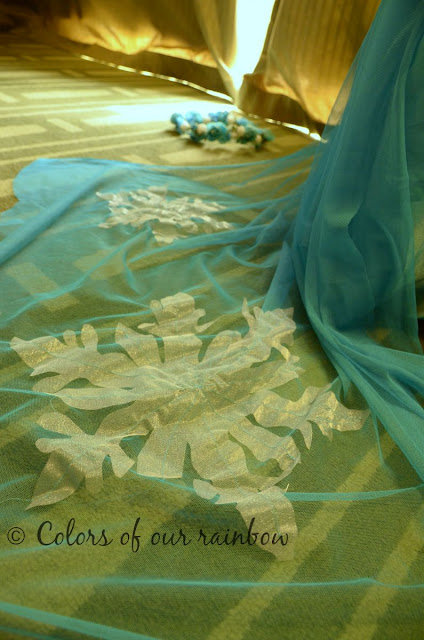

A Frozen Birthday and DIY Elsa Dress @http://colorsofourrainbow.blogspot.ae/


There was no over-the-top pinterest-y party. But we had planned a little sprinkling of FROZEN to keep the birthday girl happy.

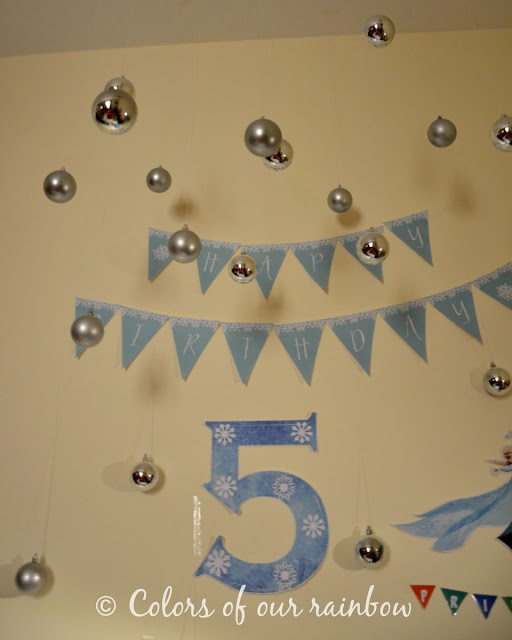
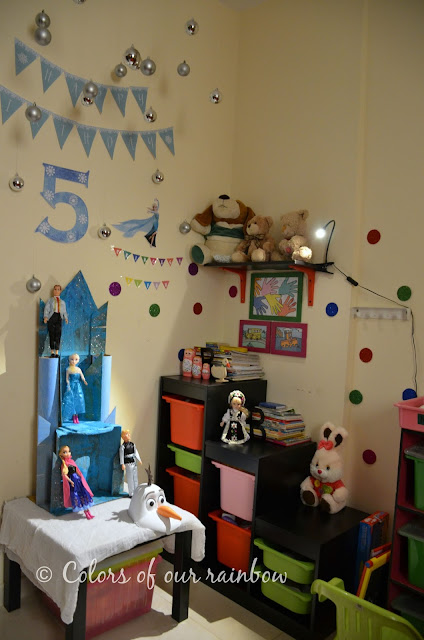
An ice castle made of discarded cardboard boxes  for her new set of FROZEN dolls . It was so difficult to keep this in hiding till we revealed it to her on the birthday morning. Some silver christmas ornament balls strung from the ceiling instead of snowflakes.

I got hold of a cute little Happy Birthday Banner printable by LITTLE HOUSE ON THE CIRCLE.
This saved us some time as at the last moment as I was too busy with the dress.  Here is also a link for the fonts we used for the FROZEN Number.

Thus came about a frozen-themed Play Space to surprise the birthday girl as she woke up.


A Frozen Birthday and DIY Elsa Dress @http://colorsofourrainbow.blogspot.ae/


A Frozen Birthday and DIY Elsa Dress @http://colorsofourrainbow.blogspot.ae/

A Frozen Birthday and DIY Elsa Dress @http://colorsofourrainbow.blogspot.ae/

Now all that was left was a custom birthday invite for a few of her friends. Some Frozen clipart  and we came up with this.
Superimpose a picture of the birthday girl in her ELSA dress over this add up your customized wordings and you have your own frozen personal invite.


A Frozen Birthday and DIY Elsa Dress @http://colorsofourrainbow.blogspot.ae/


We had around 5 of her friends over to a local learn and play center for lots of running around and fun, and some cake and snacks after wards.

But the biggest event we were lucky to manage to get hold of to celebrate was DISNEY ON ICE. She sang "LET IT GO" till the end.
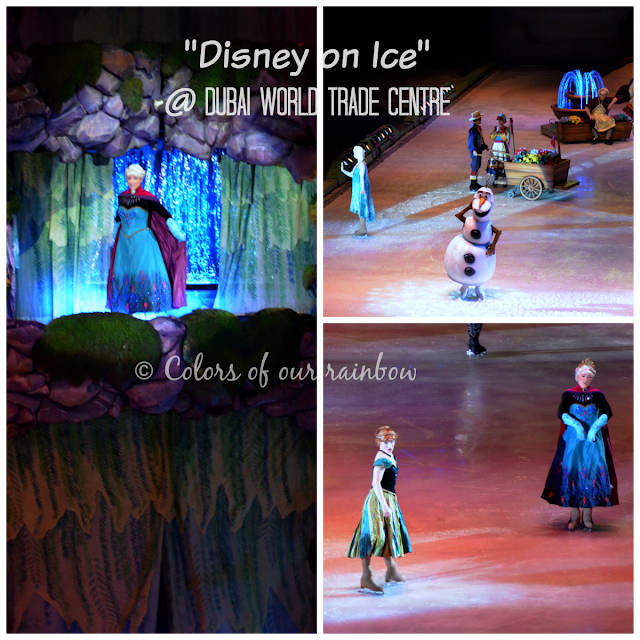

A Frozen Birthday and DIY Elsa Dress @http://colorsofourrainbow.blogspot.ae/


We had one happy birthday girl :)

Frozen has been done a million times and is all over the internet.
But here is the list of printables and other resources I used to get this little delight up for my daughter.

FROZEN CLIP ART FOR A D-I-Y INVITE
http://www.great-kids-birthday-parties.com/frozen-clipart.html

FROZEN FONT FOR DECOR
http://www.great-kids-birthday-parties.com/frozen-font.html

FROZEN BANNER AND PRINTABLE
https://littlehouseonthecircle.wordpress.com/2014/03/31/a-frozen-birthday/

FROZEN isn't going to go anywhere anytime soon, most of the little girls would want to be ELSA for some more time. And one more Blog post on a FROZEN birthday wouldn't be too much would it?

SEE YA!!

FARZ & ZAIN


THIS POST IS LINKED TO:


THREADING MY WAY


SEW+SHOW #38

Wake Up Wednesday-83

WORK IT WEDNESDAY -10

So happy to be featured in one of my favorite blog  www.threadingmyway.com Thank you, Pam.

Happydays-52 @WHAT KATY SAID

What Katy Said

Momsterslink-2

Domesticated Momster

The Resourceful Mama

Tuesday, 14 April 2015

SPRING INSPIRED: D-I-Y Multi-color frock for kids- Tutorial included.

Spring in UAE seems a misnomer to me. It probably just alludes to the oncoming heat of the summer.

Saying that, it is still pleasant in the evening though the daytime has become rather hot. We are not great fans of summer, being outdoor people. But two good things about summer is we can pack away our winter woollens and get more closet space and I can sew cute summer clothes for my little daughter :) 
I thought that my daughter deserved a cute little cotton frock to welcome the change in temperature. I love the way this beautiful dress turned out and it looks amazing on my daughter.

So here is a tutorial, of a fully lined, sleeveless, embellished, lightweight cotton frock with  button enclosures at the back. The in detail steps of drafting the bodice and skirt pieces and the basic sewing steps are here: DIY Girls Dress Part 1 and DIY Girls Dress Part 2.


Spring inspired multicolor diy frock for kids with tutorial @http://colorsofourrainbow.blogspot.ae/


Some things I really love about this dress:
  • Light-weight and fully lined
  • The pop of color against a white background
  • The detail of the embossed cotton fabric
  • Completely soft and smooth on the inside. Even the trims have been stopped short of the full arm hole, to prevent discomfort as the little one moved her hands. I had to really work hard on this, because of my daughter. She is fussy and would refuse to wear any prickly and poky dress, no matter how much she loved it. There was even a stage where I was picking off tags from store bought dresses. This was one of the reasons I was motivated to start sewing cute little dresses for my daughter, keeping her preferences, needs and liking in mind.
  • The yoke- lovely blast of color
  • The pom-pom- such a cute little thing
  • The assorted buttons 
  • The gathered ribbon tie-back
  • The lining of the skirt short of the main fabric revealing the embossed pattern on the main fabric beautifully

Spring inspired multicolor diy frock for kids with tutorial @http://colorsofourrainbow.blogspot.ae/


STEP 1: IDEA, FABRIC, EMBELLISHMENTS, and BUTTONS.
This idea of multiple colors colliding and complementing each other on a neutral backdrop was looming in my head for a long time. Finally I got some free time to get things going. I went to my local sewing supply store and picked up some cute and colorful stuff, yokes, trims, ribbons, buttons and an embossed cotton fabric in white. I thought that the embossed floral pattern provided a pretty little detail to the white fabric.


STEP 2: PATTERN, BODICE and SKIRT PIECES, LINING
Went about with the same way of drafting the pattern for both the bodice and skirt part as in my tutorial DIY dress part 1 and DIY dress part 2.The tutorials for the little additions like adding the yoke, the button placket, and the sash are up here.


Spring inspired multicolor diy frock for kids with tutorial @http://colorsofourrainbow.blogspot.ae/

The only change is, in the front bodice and lining fabric the neck has not been cut. We will be doing this as we place the yoke, so that it matches. 

STEP 3: YOKE, SHOULDER SEAMS
1.Place the yoke on the bodice and lining fabric and mark and cut off the neck following the curve of the yoke applique, leaving 1 cm as a seam allowance.
2.Separate the bodice fabric and attach the yoke to it following the pattern and simply sewing it down using a straight stitch. 
3. Join the shoulder seams of the bodice fabric. Join the shoulder seams of the lining fabric separately.
Spring inspired multicolor diy frock for kids with tutorial @http://colorsofourrainbow.blogspot.ae/


STEP 4: BODICE, NECK and ARM HOLE
Keeping the right sides of the bodice and lining fabric together, sew along the neckline matching up with the yoke. Sew along the arm holes too. Turn the bodice inside out through one of the shoulder straps.


Spring inspired multicolor diy frock for kids with tutorial @http://colorsofourrainbow.blogspot.ae/

STEP 5: TIE-BACK, EMBELLISHMENTS and BODICE SIDE SEAMS
1. Attach the side seams of bodice and lining individually. The tie-back will be attached to the bodice fabric at the side seams.I hand sewed the pom-pom trim around the arm hole, leaving the lower end where the arms meet the body. The stitches all lie only on the main fabric and are completely hidden from the inside of the bodice.
2. This shows a clearer picture how the tie-back (here I've used multi-color ribbons) is attached on the bodice fabric alone at the side seams.
3. This is the finished bodice with lining. It has no seams or sewing showing on the inside. Completely soft on the delicate skin of children!

Spring inspired multicolor diy frock for kids with tutorial @http://colorsofourrainbow.blogspot.ae/


STEP 6: ATTACHING MAIN SKIRT FABRIC TO THE TOP BODICE FABRIC ALONE
Gather the main fabric for the skirt, and sew it to the bodice fabric. Do not join it to the bodice lining. 

Spring inspired multicolor diy frock for kids with tutorial @http://colorsofourrainbow.blogspot.ae/

STEP 7: SASH
Attach the sash at the bodice and skirt joint of the main fabric only. In this case I had to hand sew the entire thing down as the pompoms wouldn't feed well through the sewing machine. But in simpler sashes machine sewing would do.

Spring inspired multicolor diy frock for kids with tutorial @http://colorsofourrainbow.blogspot.ae/


STEP 8: ATTACHING THE LINING SKIRT TO BODICE LINING
Now gather the lining fabric for the skirt and sew it to the bodice lining, such that the seams lie towards the main fabric. The whole idea is to have all the rough seams ( neck, armholes, waist) in between the main fabric of the frock and its lining. Also the yoke, tie-back, sash and any other embellishment are added to the main fabric of the bodice, so that none of the sewing shows through the inside of the dress. The dress turns out pretty smooth and comfortable in the sweaty months to come. 

Spring inspired multicolor diy frock for kids with tutorial @http://colorsofourrainbow.blogspot.ae/


STEP 9: FAUX BUTTON PLACKET, BUTTON HOLES and BUTTONS

1. At the back seams for the button, double fold inside for about half an inch and sew down on both edges, till the length the button plackets are needed. Repeat same on the other side. 
2.Now overlap the edges and sew them together at the lower end till where the buttons are required. Mimic the stitching that is usually seen on button plackets 'X'.
3. Attach the skirt seams together sewing all four layers - two layers of bodice and two layers of lining together.

Spring inspired multicolor diy frock for kids with tutorial @http://colorsofourrainbow.blogspot.ae/


STEP 10: BUTTON HOLES, BUTTONS

Mark the button holes, and sew the button hole openings. Align and attach buttons on the other side. 


Spring inspired multicolor diy frock for kids with tutorial @http://colorsofourrainbow.blogspot.ae/


There you go this was the perfect end result. 


Spring inspired multicolor diy frock for kids with tutorial @http://colorsofourrainbow.blogspot.ae/


I promise to get better with the photos :) Those taken a little later in the day have turned orangey:/
I would love to hear your opinion on the dress. 

Cheers to spring and the spring inspired dress!
Happy Sewing.
FARZ

This post has been linked to
Threading my way
Sew cute Tuesday-47
Craftastic Monday @Sewcando
Wake up Wednesday-Linky party-64
Hand Made Tuesdays @LadyBug Blessings.com
Sew+Show #25 @straight-grain.com
The Best of the Blogosphere
Lou Lou Girls Fabulous Party 55
Merry Monday Link Party 51

An amazing experience to be featured at Threading my way by Pam, yet again..

I would suggest if you are into sewing or designing anything, please do hop over to her blog. She has got amazingly huge collection of tutorials for almost anything under the sun in her ongoing linky party. 

Thursday, 22 January 2015

DIY GIRL'S FROCK: The story of a purple dress - Part 2

Welcome back!

Here is the continuation to the bodice we created here DIY GIRL'S FROCK: Story of a purple dress- Part 1

DIY Purple frock 2 @colorsofourrainbow


The pieces for the skirt are basically rectangles with the height corresponding to the length plus seam allowances.And the breadth of the rectangle being, double the waist circumference if you need lots of pleats, as I have done (this can be customized).

DIY Purple frock 2 @colorsofourrainbow

Now we start with the skirt. You have two separate pieces the outer piece and the inner lining. We are going to be adding some crinoline to the inner lining to give the jersey skirt a bit of poof.

DIY Purple frock 2 @colorsofourrainbow

After the side seams, when joining the back seams of the skirt allow for a clearance for the zipper to be placed.
I always leave the zipper longer and involving the skirt and not just the bodice. Helps in dressing up the tiny kids.

DIY Purple frock 2 @colorsofourrainbow


You may join the lining and the skirt now, or wait till we have gathered them to fit the bodice.
I chose to gather the lining and skirt separately and then attach to the bodice.


Before you gather the skirt we need to measure the waist circumference of the bodice. This is the length to which we are going to gather the skirt. You may add darts on the bodice if you prefer.

DIY Purple frock 2 @colorsofourrainbow

Gather away and sew it down. I prefer to gather by hand basting.

DIY Purple frock 2 @colorsofourrainbow


Now we need to get back to the bodice. Remember how we had left the side seams of the bodice of around 1" un-stitched. We are going to be adding our sash here now. You can make a sash yourself, but I chose to use a ribbon instead. A bit lazy :-)

DIY Purple frock 2 @colorsofourrainbow

We are going to attach away the gathered skirt (bodice and lining attached and gathered), to the bodice.

DIY Purple frock 2 @colorsofourrainbow


The dress is nearly getting ready. We have the zipper next. I love the invisible zipper, they finish up beautifully. Once you get a hang of inserting them you are going to be hooked.

DIY Purple frock 2 @colorsofourrainbow

The invisible zipper need to be prepared first by opening the zipper up and ironing on it to make it flat. This helps you to sew it as close to the zipped end. The image shows you the difference between the original zipper on the left and the right one which is opened up and ironed.

DIY Purple frock 2 @colorsofourrainbow


Now place the zipper on the dress as above and pin away. You need to place the zipper facing up on the dress. Then twist the ends such that the zipper end faces outward. Do I make sense?? Look closely at the image it gives a better idea.
Now stitch closely to the zipper as you can. You may use a zipper foot in your sewing machine, I used a regular sewing foot.  The cut off the excess zipper and stitch down with the skirt.

You have an amazing tutorial here for an invisible zipper http://lladybird.com/2014/01/28/invisible-zippers-my-method/
You can get wonderful ideas of how to finish the ends of the zipper too.

DIY Purple frock 2 @colorsofourrainbow


I finished up the zipper and this is how it looks when closed. Added up a pearl button and a button loop to the end. You can add anything buttons, hooks, etc.

DIY Purple frock 2 @colorsofourrainbow

Look how I finished up this project.
I left the seams of the skirt at the bottom untouched as it was jersey and I got the selvage.
Added a few embellishments, puffed sleeves with piping, and there is the beautiful dress. This is a basic model which can be modified into many ways. You can add sleeves, embellishments, sash, broach, fancy pleats, literally anything.

DIY Purple frock 2 @colorsofourrainbow


You can stop at the left, lower picture for the basic frock and design it as you please. Sorry, the pics don't seem that great. The little drama queen would just not pose.

Well there you go! A pretty little dress for a pretty little girl.
My daughter loved her new dress!

Go on make one for yours!!
FARZ

This post is linked to
coloursdekor.blogspot.ae: Weekly story 3
April linky party @www.notjustahousewife.net

CELEBRATIONS: We have been featured here: www.threadingmyway.com
Delighted. :-)
Thank you, Pam.

Sunday, 18 January 2015

DIY GIRL'S FROCK: The story of the purple dress - Part 1

No, I am not a seamstress, I am a dentist. And between my work hours I love sewing clothes for my little girl.

I learnt sewing when I was on vacation, at school, waiting for my board exam results. Mostly due to the insistence of my mother who thought it may help me out in need, partly because I wanted to kill away time and the nervousness of waiting for the dreaded results of my school exams.

The teacher was an old lady, who taught me simple basics over a period of 20 days on a rickety old machine run by one's feet!! The results were out, off I went to college for a gruelling five years of dental undergraduate studies, and the years as an intern flew by. Then marriage happened, and I had long ago forgotten the sewing machine or anything to do with it. But over 4 years ago I was blessed with a sweet little daughter.

Don't know if pregnancy changes the brain, but I suddenly found myself fascinated by little girl clothes. I would day dream about some pretty little dress and conjure up images in my mind dressing up my little one in them. After choosing a fabric and a tailor I would painstakingly make sketches and explain my piece of imagination to them. I would be greeted by a vehement shaking of the head , telling me they don't do it.

Then over her first birthday, I took the plunge and bought the most basic sewing machine of the rack, my Brother Ls-2125. Dusted out my basic knowledge of sewing, Googled up so much great information available online. Many trial and errors and 3 years of sewing I have come up with pretty good end results. Often after the 8-hour work shift you will see me sewing away like crazy, making tiny little clothes for my daughter or niece.

DIY Purple dress for child @colorsofourrainbow.blogspot.ae
My trusty old machine!!


This simple purple frock is out a purple velvet jersey fabric and was made over say 5 hours or so.

Lets begin with some things I learned through trial and error.
- Drafting your own pattern is very simple, just use a T-shirt to draft the bodice.
- Draft your pattern on a paper or muslin if you are a beginner, saves a lot of costly fabrics from being ruined.
- Pin/ use weight as you cut or sew. Gives perfect edges.
- A serger is not necessary, just use the widest zigzag on your machine.
- Always oil and clean and use a new needle for each of your projects. Prevents you from getting stuck and frustrated in between.
- Sew on scraps of the fabric to get hang of the thread tension, before starting the project.
- Clip away loose thread and finish your inner seams as good as you can. Your end product will look like its been bought of a rack.
- Always open up a seam and iron on them before the next step. Gives a perfectly finished garment.
- Make sure that children's clothing has as minimum seams inside as possible. The technique of a lined bodice here gives perfect results each time.Here is a great tutorial on lined bodices http://www.sewalongs.com/moneta/moneta-sew-the-bodice-all-versions 

And sew away.

DIY Purple dress for child @colorsofourrainbow.blogspot.ae


DIY Purple dress for child @colorsofourrainbow.blogspot.ae


1- Use a T shirt to draft the bodice and its lining. Leave 1/2" seam allowance when cutting.

DIY Purple dress for child @colorsofourrainbow.blogspot.ae


2- Sew the front and back pieces of the bodice along the shoulder seams. Repeat with lining.

DIY Purple dress for child @colorsofourrainbow.blogspot.ae


3- Iron the seam allowances along the shoulder open.

DIY Purple dress for child @colorsofourrainbow.blogspot.ae

4- Place the bodice and its lining, right sides facing each other. Pin along the neck and the arm holes.

DIY Purple dress for child @colorsofourrainbow.blogspot.ae

5- Sew along the neckline and arm holes. Once done snip along the seam allowances to get the right curves when turned.

DIY Purple dress for child @colorsofourrainbow.blogspot.ae


6- Turn in the bodice through the shoulder straps.

DIY Purple dress for child @colorsofourrainbow.blogspot.ae


7- Open up the side seams of the bodice. Sew in a straight line with the right sides of the bodice together and lining together, separately as shown.


DIY Purple dress for child @colorsofourrainbow.blogspot.ae


8- The bodice is ready to be joined to the skirt. The we have the sash, zipper and the embellishments.


Well I have tried my best to document the steps that went into making this dress. Jersey is a very easy fabric, and not as difficult as imagined. Its very forgiving on the fit. And looks great if you use a double needle to get the perfect edges.

The post is turning out to be humongous. Hence there will be a Part 2, coming up on thursday.
Stay tuned.

Happy Sewing
Farz

This post has been linked to
Coloursdekor.blogspot.ae: Weekly story 3
April linky party @www.notjustahousewife.net

NOTE: You can find the Part 2 here http://colorsofourrainbow.blogspot.ae/2015/01/diy-girls-frock-story-of-purple-dress_22.html

CELEBRATIONS: We have been featured here :www.threadingmyway.com
Thank you, Pam.